How to Export
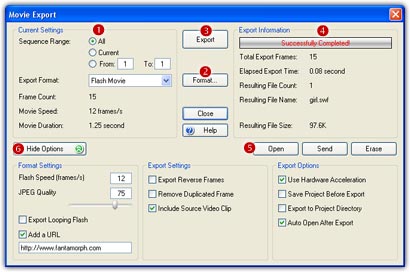
As described in Lesson 8, click the Export Movie button on the Movie Toolbar or choose File/Export Movie menu, the Movie Export Window below will appear.
Current Settings
In the Current Settings
frame (![]() ),
you can choose export all sequences, only the current sequence, or a sequence
range. You can select one of the 7 export
formats (Image Sequence, AVI Movie, Animated
GIF, Flash Movie, Web Page, Screen Saver and Standalone EXE) offered in the
format list. You can also find the info about movie length, speed, and duration.
Click the Format button (
),
you can choose export all sequences, only the current sequence, or a sequence
range. You can select one of the 7 export
formats (Image Sequence, AVI Movie, Animated
GIF, Flash Movie, Web Page, Screen Saver and Standalone EXE) offered in the
format list. You can also find the info about movie length, speed, and duration.
Click the Format button (![]() )
to learn more about the export format.
)
to learn more about the export format.
Export
Now you can click the Export
button (![]() )
to start export. When export, you can click the Cancel button to cancel
the export process, and no resulting files will be created. You can click the
Export button more than once to export the same morph as different format or
using different settings.
)
to start export. When export, you can click the Cancel button to cancel
the export process, and no resulting files will be created. You can click the
Export button more than once to export the same morph as different format or
using different settings.
Export Information
In the Export Information
frame (![]() ),
you can see the percentage on the progress bar during the export process, once
done, further information about the elapsed time and resulting files will be
displayed.
),
you can see the percentage on the progress bar during the export process, once
done, further information about the elapsed time and resulting files will be
displayed.
Manage Results
There is a group of buttons (![]() )
to mange the resulting files.
)
to mange the resulting files.
- Open: Click this button to open the resulting file with the system associated program.
- Send: Do you want to share your proud morphs with your friends? Just click this button and then fill in the destination email address.
- Erase: If the result is not satisfied, simply click this button to delete the resulting files.
Options
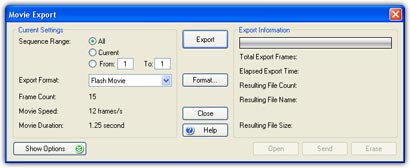
Click the Show/Hide Options
button (![]() )
to show/hide the export settings and options. By default, you see a simple and
clean export interface as the option items are hidden.
)
to show/hide the export settings and options. By default, you see a simple and
clean export interface as the option items are hidden.
Format Settings
You can set some parameters for the current format. Each format has its own parameters.
- JPEG Quality: Affects the quality of exported JPEG images and flash movies. The default value is 75. The bigger the value is set, the higher the export quality will be, as well as the more rapidly the export file size will increase. Try to set it to different value, and investigate the quality and size of the export file to get an appropriate value for it.
- Image Resolution: You can set the DPI value for the exported still images if you will use them for printing. The default value is 0 which means each image format will use its own default resolution.
- Export 32-Bit Image: If this option is checked, you can export 32-bit with alpha images in BMP, PNG, TIFF or TGA format.
- AVI Speed: Set the frame rate of exported AVI files from 1 to 60 frames per second. The default value is 15.
- Export Compressed AVI: If this option is checked, you can use any installed video codec to compress AVI movies into smaller files. In most cases, make this option unchecked and you can export uncompressed AVI files directly. It is strongly recommended to create uncompressed AVI files if you want to import the results into video editing software.
- Export 32-Bit AVI: If this option is checked, you can export 32-bit with alpha AVI movies. You can then import 32-bit AVIs into video editing software as overlay video clips.
- GIF Speed: Set the frame rate of exported GIF files from 1 to 60 frames per second. The default value is 15.
- Export Looping Animated GIF: If this option is checked, the resulting Animated GIF files will be looping.
- Export Transparent GIF: You can export a transparent morph to a transparent Animated GIF file if this option is checked.
- Transparency Threshold: Use this value to control the transparent area in the resulting file. The pixels which alpha is lower than the threshold will be transparent.
- Flash Speed: Set the frame rate of exported Flash files from 1 to 60 frames per second. The default value is 12.
- Export Looping Flash: If this option is checked, the resulting Flash files will be looping.
- Add an URL to Flash: When you export a morph in Flash format, you can add a URL to the resulting Flash movie so that the viewers can easily reach the URL with just one click. It's especially useful for web designers.
Export Settings
- Export Reverse Frames: Some additional frames will be appended to the resulting movie for smooth playing loop. For instance, normal exported frames are No.1, 2, 3, ..., 15 frame, then the No.14, 13, 12, ..., 2 frame will be appended after No. 15 frame if this option is checked.
- Include Source Video Clip: If this option is checked, all frames of the source AVI videos can be exported to resulting morphs. Note, this option is only available in FantaMorph Pro and Deluxe.
- Remove Duplicated Frame: Eliminate the duplicated frame from the end or the beginning of two adjacent sequences.
Export Options
- Use Hardware Acceleration: When hardware acceleration is enabled, you can get the best export performance. But you should disable this function if your system has problem with hardware acceleration. Besides, the maximum export size depends on display card if hardware acceleration is enabled, in most cases it is less than 4096 x 4096 pixels. So if you want to export very large images for print, you also need to turn off this switch so that you can export images up to 16384 x 16384 pixels.
- Save Project Before Export: If this option is checked, the current project will be auto saved before export.
- Auto Open After Export: If this option is checked, the resulting file will be automatically opened with the system associated program after export.
- Export to Project Directory: If this option is checked, the exported results will be located in the project directory instead of the export directory. This makes you to save a source project as well as its resulting files in the same directory.