How to Use Face Library
< Back
Index
Next >
With this new add-in, you can easily collect and store source
images (especially for the portrait photos) along with key dots in a classified
library. You can then simply drag some objects from the library to create a new
morph or face composite without any new editing work.
1. To store a face in the library, choose the
Image/Save to Face Lixbrary menu. The face with its aligned dots will be
stored in the root directory of the library.
2. Choose the Add-Ins/Face Libray menu to open
the window below.
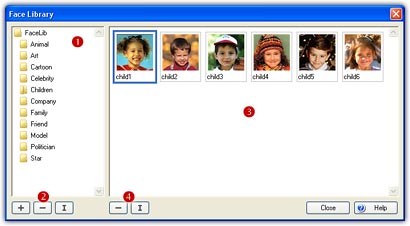
3. There is a button group ( )
used to manage the Face Directory (
)
used to manage the Face Directory ( ).
You can choose the Add button (+)
to create a new directory, choose the Delete button (-)
to delete a directory (must empty), or choose the Rename button
(I)
to rename a directory.
).
You can choose the Add button (+)
to create a new directory, choose the Delete button (-)
to delete a directory (must empty), or choose the Rename button
(I)
to rename a directory.
4. To classify the faces temporarily stored in the root
directory, just drag the faces from Face Library ( )
to a destination directory ().
)
to a destination directory ().
5. There is a button group ( )
used to manage the faces in Face Library. You can click the
Delete button (-)
to delete a face from Library. Note, the source image file of the face won't be
deleted. Click the Rename button (I)
to rename the selected face in Face Library.
)
used to manage the faces in Face Library. You can click the
Delete button (-)
to delete a face from Library. Note, the source image file of the face won't be
deleted. Click the Rename button (I)
to rename the selected face in Face Library.
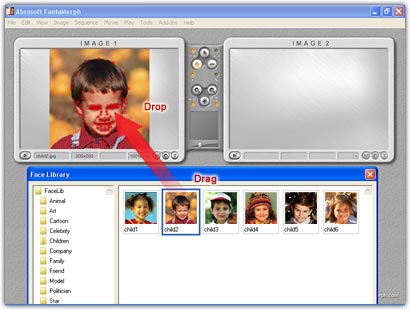
6. When you want to reload the stored faces to a new
project, you can
simply drag a face from the Face Library to the source images area in the main
interface. In this way you can create a new morph or face composite very
quickly.
Remarks
- Face Library is only available in FantaMorph Deluxe.
Back to top
