How to Use Face Locator
< Back
Index
Next >
When morphing from one face to another, the program can automatically detect the
facial features (eyes, nose, mouth, etc.) and place key dots on appropriate
positions. This will extremely save your time.
1. Choose the Add-Ins/Face Locator menu to open the
window below.
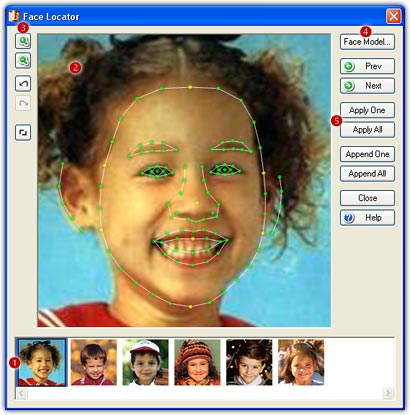
2. All the source images in current project are listed
here ( ).
Click a thumbnail to start to locate the facial features on the source image.
You can also click the Prev/Next
button to load the previous or next source image.
).
Click a thumbnail to start to locate the facial features on the source image.
You can also click the Prev/Next
button to load the previous or next source image.
3. The locating result will be presented in the left
window ( ).
In this version, total 112 key dots will be placed on a face, and this will make
the final morphing result very smooth.
).
In this version, total 112 key dots will be placed on a face, and this will make
the final morphing result very smooth.
4. To achieve more accurate locating result, you can do a
little manual adjustments to make the locating template
displayed in the right window ( ) as close to
the face on the image as possible. Once the locating template is changed by any
following adjustment, a corresponding locating result will be presented in the left window
in real time. When you move mouse over these edit
handles, a corresponding cursor will appear to indicate what kind of adjustments
you can do, see below.
) as close to
the face on the image as possible. Once the locating template is changed by any
following adjustment, a corresponding locating result will be presented in the left window
in real time. When you move mouse over these edit
handles, a corresponding cursor will appear to indicate what kind of adjustments
you can do, see below.
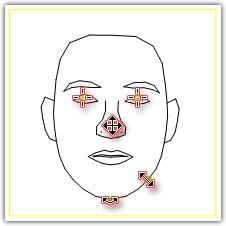
- Adjust Pupils (
 ):
You can directly click on the center of the pupils on the image or drag the two
circle handles to move the pupils of the locating template to the correct positions. This is the
easiest and fastest way to adjust the locating template.
):
You can directly click on the center of the pupils on the image or drag the two
circle handles to move the pupils of the locating template to the correct positions. This is the
easiest and fastest way to adjust the locating template.
- Translate (
 ): Move cursor over this square handle and drag it to move the
locating template.
): Move cursor over this square handle and drag it to move the
locating template.
- Rotate (
 ): Move cursor over this square handle
and drag it to rotate the locating template.
): Move cursor over this square handle
and drag it to rotate the locating template.
- Scale (
 ): Move cursor over this square handle
and drag it to scale the locating template.
): Move cursor over this square handle
and drag it to scale the locating template.
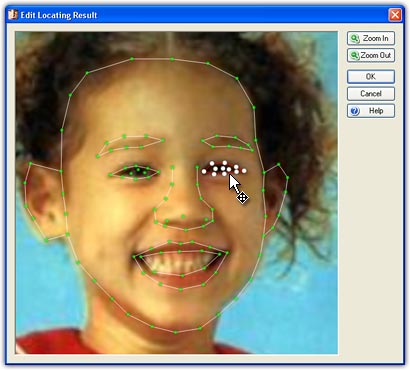
5. If you want to manually edit the locating result to
make it completely perfect, double-click the left window or click the Edit
button ( ).
On the edit window below, you can simply drag a dot or even a line to move it to
the perfect position. Please note that to move a line directly you should hold
the CTRL key while dragging, otherwise the program will always automatically
detect the better position for the line. Also, you can zoom the edit zone by using mouse wheel scrolling or pressing the key
"," or ".".
).
On the edit window below, you can simply drag a dot or even a line to move it to
the perfect position. Please note that to move a line directly you should hold
the CTRL key while dragging, otherwise the program will always automatically
detect the better position for the line. Also, you can zoom the edit zone by using mouse wheel scrolling or pressing the key
"," or ".".
6. When all the locating results are satisfied, click the
Apply All button ( )
to apply the results to the project. You can still edit the key dots in the main
interface when needed.
)
to apply the results to the project. You can still edit the key dots in the main
interface when needed.
7. When a new source image added to the project, please
launch Face Locator to preview and adjust the locating result, you then need to
click the Apply One button ()
to apply the result only to the new source image.
Remarks
- Since Face Locator locates
facial features automatically, there are some requirements for the pictures it
can work with. To achieve the best locating result, the pictures should be taken
full-faced and oriented vertically with good lighting conditions. The variation
of head position, facial expression, illumination, age and race etc., will cause
the locating result unsatisfied or even unacceptable.
- Face Locator is only available in FantaMorph Deluxe.
Back to top
