How to Use Face Locator
When morphing from one face to another, the program can intelligently detect the facial features (eyes, nose, mouth, etc.) and automatically place key dots on appropriate positions. This will extremely save your time.
1. Choose the Add-Ins/Face Locator menu to open the window below.
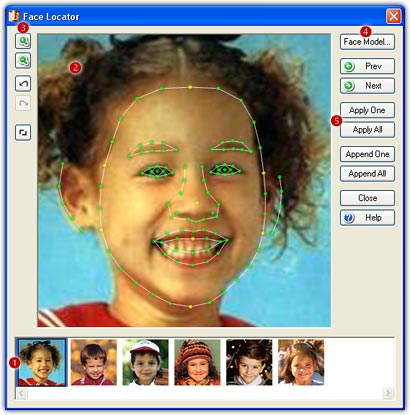
2. All the source images in current project are listed
here (![]() ).
Click a thumbnail to start to locate the facial features on the source image.
You can also click the Prev/Next
button to load the previous or next source image.
).
Click a thumbnail to start to locate the facial features on the source image.
You can also click the Prev/Next
button to load the previous or next source image.
3. The locating result will be presented in the left
window (![]() ).
By default, total 112 key dots will be placed on a face, and this will make
the final morphing result very smooth.
).
By default, total 112 key dots will be placed on a face, and this will make
the final morphing result very smooth.
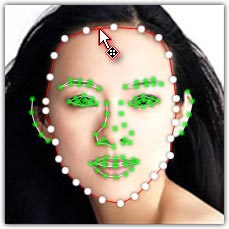
4. To achieve more accurate locating result, you can do a
little manual adjustments. Use these tool buttons (![]() )
to zoom in/out, undo/redo, and set face location. There are two modes when edit
a dot: Intelligent and Manual. Press the Shift key to switch between the two
modes.
)
to zoom in/out, undo/redo, and set face location. There are two modes when edit
a dot: Intelligent and Manual. Press the Shift key to switch between the two
modes.
- Intelligent: When you move cursor over a dot and drag it to move this dot to its accurate position, the other dots will be automatically move to their ideal positions. Our intelligent face feature extraction engine will help you align key dots very quickly. After you move a couple of dots to their accurate position, you may find that all the dots have been aligned. Note, in Intelligent mode, you can hold the CTRL key and drag a dot to switch to Manual mode temporarily.

- Manual: When you drag a dot to its accurate position, only this one dot will be moved and the other dots won't be changed. Note, in Manual mode, you can hold the CTRL key and drag a dot to switch to Intelligent mode temporarily.
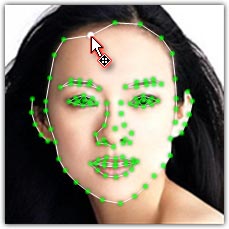
In both Automatic and Manual mode, you can move cursor over a line and drag it to translate all the key dots connected by the line.
5. By default, a 112-dot face model is implemented. If you
don't need all the 112 key dots, for example, sometimes you don't want to place
key dots on ears or forehead, just click the Face Model button (![]() )
to customize the face model. See more about "How
to Customize Face Model".
)
to customize the face model. See more about "How
to Customize Face Model".
6. When all the locating results are satisfied, click the
Apply All button (![]() )
to apply the results to the project. You can still edit the key dots in the main
interface when needed.
)
to apply the results to the project. You can still edit the key dots in the main
interface when needed.
7. When a new source image added to the project, please
launch Face Locator to preview and adjust the locating result, you then need to
click the Apply One button (![]() )
to apply the result only to the new source image.
)
to apply the result only to the new source image.
8. If there are two or more faces on a source image, you need to apply key dots on the first face, and then launch Face Locator again, detect/edit key dots on the second face, and click the Append All or Append One button.
Remarks
- Since Face Locator locates facial features automatically, there are some requirements for the pictures it can work with. To achieve the best locating result, the pictures should be taken full-faced and oriented vertically with good lighting conditions. The variation of head position, facial expression, illumination, age and race etc., will cause the locating result unsatisfied or even unacceptable.
- Face Locator is only available in FantaMorph Deluxe.