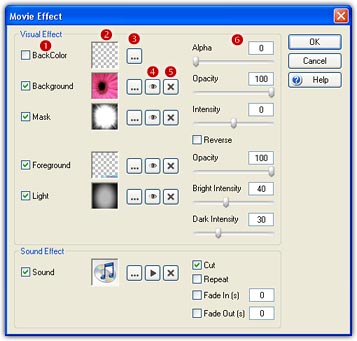
How to Use Add-on Effects
There are 6 add-on effects to decorate the movie: background color, background, mask, foreground, light, and sound. Choose the Movie/Effect menu to open the window below.
There are 8 add-on effects you can use to decorate the sequence: background color, background, mask, foreground, transition, light, trail, radial. Each sequence can have different effects. Choose the Sequence/Effect menu to open the window below. You can use movie effects and sequence effects simultaneously in a project, the difference between them is that a movie effect acts on the whole movie zone but a sequence effect only acts on the camera zone. So, we generally use sequence effects along with camera.

Background
As described in "How to Use 32-bit with Alpha Images", if the source images are 32-bit with alpha, the morph can be smoothly blended with any single color or any other image as a background. If the source images are not 32-bit (in most cases, you will find 24-bit images), you must first use a mask, otherwise, the background will be invisible.


1. Click the Select Effect button (![]() ), then choose an
image file as the Background. A small thumbnail of this image will be show as
the Effect Icon (
), then choose an
image file as the Background. A small thumbnail of this image will be show as
the Effect Icon (![]() ),
and the Effect Switch (
),
and the Effect Switch (![]() ) will be
checked to indicate the background is
being used.
) will be
checked to indicate the background is
being used.
2. You may click the Set Effect Camera button (![]() ) to
set a camera track for the Background effect. See more about "How
to Use Camera".
) to
set a camera track for the Background effect. See more about "How
to Use Camera".
3. You may turn on/off the Effect Switch or click Effect Icon at anytime to enable or disable the Background effect.
4. You can double click the Effect Icon or click the Select Effect button again to load another image to see the effect.
5. If you do not want to use the Background displayed,
right-click the Effect Icon or click the Clear Effect button (![]() ) to clear it.
) to clear it.
6. In addition, you can select a pure color as background color. Note that the background image can be blended with the BackColor. It's a useful way to change the hue of the background image.
7. Each effect has its own Effect Parameter (![]() ).
You can adjust the background transparency.
).
You can adjust the background transparency.
Mask
The mask image should be 256 level grayscale bitmap. The brightness of every pixel of the mask image will be applied to the transparency of the corresponding pixel of the morph. That means a white pixel will cause the corresponding morph pixel to be opaque, a black pixel will cause a fully transparent pixel, and various levels of gray will cause corresponding levels of transparency. In a word, when you add a mask to a morph, the morph will take on the mask shape. You can adjust the mask intensity or have the white/black reversed.


There are further samples below. Note that you can use any image as a background, but we used a single color for our demo so that you could see the mask effects more clearly.


Foreground
The foreground should be a 32-bit with alpha image that you choose to overlay on the morph to make a photo frame, graphics caption or other such effect. You can adjust the foreground transparency.


Transition
The transition image should be a 256 level grayscale bitmap. The brightness of every pixel of the transition image will be applied to the dissolving sequence of the corresponding pixel of the morph. That means a dark pixel will cause the corresponding morph pixel to be dissolved a little early, while a bright pixel will cause the corresponding morph pixel to be dissolved a little late. Tick the Reverse option to make the white/black reversed. You can adjust the transition border, the larger border you set, the smoother transition will be.
|
Transition image: |
 |
Final Morph: |
|
|
Transition image: |
 |
Final Morph: |
|
Light
The light image should be a 256 level grayscale bitmap. The brightness of every pixel of the light image will be applied to the brightness of the corresponding pixel of the morph. That means a bright pixel will cause the corresponding morph pixel to be a little brighter, a dark pixel will cause the corresponding morph pixel to be a little darker. You can adjust brightness intensity and darkness intensity separately.
|
Light image: |
 |
Final Morph: |
|
|
Light image: |
 |
Final Morph: |
|
Trail
If the Overlay option is checked, using Trail will result in a motion blur effect. If the Overlay option is unchecked, using Trail will result in a motion trail effect. You should use Trail for 32-bit morph or along with Camera, or else you may won't see the motion blur/trail effect. You can set a half transparent color for the trail to adjust the hue of the motion blur/trail. You can adjust intensity to get heavy/light motion blur, or long/short motion trail.
Radial
Using Radial will result in a radiating rays effect. The rays will be over the morph if Overlay is checked, or under the morph if Overlay is unchecked. You can set a half transparent color for the rays. You should use Radial for 32-bit morph or along with Camera, or else you may won't see the radial effect. You can adjust intensity to get long/short rays.
Sound
Add a WAV or MP3 file to a morph. Click the Play button to play it after load. The sound is always played at the start of the morph. You can export the sound to AVI, Flash, Screen Saver or EXE.
Remarks
- You can use the drag & drop feature to load images for effects.
- Using too many effects will affect the performance of preview and export.
- Some outdated display drivers won't be able to render the add-on effects properly.
- Sequence Effect is only available in FantaMorph Deluxe.