Lesson 4 - Advanced Edit
We have just used the Add Dot tool; the other tools are also useful for advanced editing.
Edit Dots
There are 3 edit tools (![]() )
on the toolbar.
)
on the toolbar.
- Add (
 ): As described in
Lesson 3, you can use this tool to add
a key dot and move it to a correct location. It's the most used tool.
): As described in
Lesson 3, you can use this tool to add
a key dot and move it to a correct location. It's the most used tool. - Delete (
 ): You can use this tool to delete any useless dot. Just move the cursor on the dot
and click.
): You can use this tool to delete any useless dot. Just move the cursor on the dot
and click. - Edit (
 ):
Rectangle marquee to select a group of dots, then you can move, scale, rotate,
skew, flip, cut, delete, copy or paste by using mouse or choosing a corresponding Edit submenu.
):
Rectangle marquee to select a group of dots, then you can move, scale, rotate,
skew, flip, cut, delete, copy or paste by using mouse or choosing a corresponding Edit submenu.
Remarks
- You can delete a dot under the cursor at any time by simply right-clicking without having to choose the Delete Dot tool.
Edit Lines
Beginning version 4.0, you can use
lines to group and organize the key dots. Just choose the Dot Mode (![]() )
to add dots or Line Mode (
)
to add dots or Line Mode (![]() )
to add lines.
)
to add lines.
- Add ():
Continuously click the left mouse button to add a series of key dots connected
by a series of line segments. Hold the CTRL key and click somewhere to finish
the line and generate the last dot; hold the SHIFT key and click somewhere or
right-click somewhere to terminate the line and don't generate any new dot.
- Connect ():
If you click on a blank place, a new dot will be generated; if you click on
existed dots, you can connect them with lines. Please note that you can connect
a dot to any other dot.
- Insert ():
If you place a new dot on a line segment, the dot will be inserted into the
line.
- Delete (): Move
cursor on a line segment and click to delete the line segment, the two dots
connected by the line segment will not be deleted. If, however, you delete a
dot, all lines connected to the dot will be deleted automatically.
- Edit (): You
can drag a line segment to move it, all joint lines as well as the connected
dots will be moved together. If you click on a line, all key dots connected to
the line will be selected, you can then move, scale, cut, delete or copy them.
Remarks
- Adding lines will not affect the final morphing effects, but it makes the key dots grouped and organized clearly.
Edit Options
There are 2 options for dot adding.
- Auto Add Corresponding Dot (
 ): If this option is checked, for each click on either image, a corresponding dot
will automatically appear at the most suitable position on the opposite image.
Occasionally, in order to get a corresponding dot appeared on the same position
as the original dot, you need to hold the ALT key when add the original dot.
This is useful for adding boundary dots for a warp. If this option is unchecked,
you can add key dots on each source image separately.
): If this option is checked, for each click on either image, a corresponding dot
will automatically appear at the most suitable position on the opposite image.
Occasionally, in order to get a corresponding dot appeared on the same position
as the original dot, you need to hold the ALT key when add the original dot.
This is useful for adding boundary dots for a warp. If this option is unchecked,
you can add key dots on each source image separately. - Auto Jump to Corresponding Dot (
 ):
If this option is checked, when you added a dot on an image, the mouse cursor
will automatically jump to corresponding position on the opposite image.
):
If this option is checked, when you added a dot on an image, the mouse cursor
will automatically jump to corresponding position on the opposite image.
Remarks
- You can combine the two options to get your own favorite dot adding mode. For example, if Auto Add Corresponding Dot is off but Auto Jump to Corresponding Dot is on, you will get the fastest dot adding mode.
View Tools
There are 3 view tools (![]() )
on the toolbar.
)
on the toolbar.
- Zoom In (
 ), Zoom Out (
 ): Choose these tools and click anywhere of the source images or preview, the viewport can be
smoothly scaled from 12.5% to 800%. You can press the ALT key to switch between
these two tools temporarily.
): Choose these tools and click anywhere of the source images or preview, the viewport can be
smoothly scaled from 12.5% to 800%. You can press the ALT key to switch between
these two tools temporarily. - Hand (
 ): When a viewport can't hold an image wholly, a horizontal or a vertical scroll bar
will appear. You can drag the viewport by mouse or use the scroll bars to
show a needed part of the image. You can press the Spacebar to switch to this
tool temporarily when any other tool has been chosen.
): When a viewport can't hold an image wholly, a horizontal or a vertical scroll bar
will appear. You can drag the viewport by mouse or use the scroll bars to
show a needed part of the image. You can press the Spacebar to switch to this
tool temporarily when any other tool has been chosen.
Remarks
- You can use these tools not only on the source images, but also on the preview.
- You can adjust viewport at any time by mouse wheel scrolling without having to choose these view tools, and the viewport can be smoothly scaled up to 1600% by mouse wheel scrolling.
View Options
There are 2 options for simultaneous viewport adjusting.
- Zoom/Pan Sources Simultaneously (
 ):
When you zoom/pan any one of the two source images, the program will zoom/pan
the other one simultaneously.
):
When you zoom/pan any one of the two source images, the program will zoom/pan
the other one simultaneously. - Zoom/Pan Preview Simultaneously (
 ):
When you zoom/pan any one of the two source images, the program will zoom/pan
the preview simultaneously, and vice versa.
):
When you zoom/pan any one of the two source images, the program will zoom/pan
the preview simultaneously, and vice versa.
Remarks
- In most cases, it is recommended to make both the options checked. In this way all windows can be located at the same position automatically.
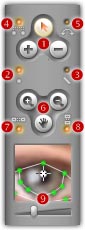
Magnifier
The Magnifier (![]() )
magnifies the area under and around the mouse cursor when you are working within
the source or target image. This enable you to have
good precision on delicate operation such as adjustment without having to zoom
in and out continuously. You can also drag the Magnifying Power Slider
to change the magnifying power from 1x to 4x.
)
magnifies the area under and around the mouse cursor when you are working within
the source or target image. This enable you to have
good precision on delicate operation such as adjustment without having to zoom
in and out continuously. You can also drag the Magnifying Power Slider
to change the magnifying power from 1x to 4x.