How to Use Sequence List
When you create a Sequence Morph as described in Lesson 9, or a Layer Morph as described in Lesson 10, you can press F2 key or choose the View/Sequence List menu to launch the Sequence List window as below.
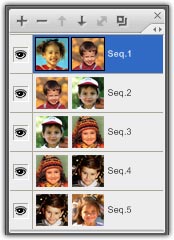
1. Each sequence is presented as a row in the list, and two source images of a sequence are presented as an image icon separately in the row.
2. Click on a row to make it to be the current sequence. A blue background indicates the current sequence.
3. Each sequence can have a name, double click on the name to edit it.
4. Click the eye icon to change the visibility of a sequence. An invisible sequence will not included in the final morph. Hold SHIFT key and click the eye icon to switch between show only this sequence/show all other sequences except this sequence.
5. Use Sequence menu or the buttons on the top of the Sequence List window to edit (add, delete, move up, move down, link, duplicate) the sequence list.
Remarks
- For Sequence Morph, use the link button to make Image 1 of the current sequence is the same as Image 2 of the last sequence.
- For Layer Morph, the first sequence is the top layer, the last sequence is the bottom layer.
- Double click directly on an image icon to launch the Import Image window.
- Drag a row to move the sequence position.
- Drag an image icon to another image icon (even in another sequence) to duplicate the source image.