How to Use Camera
With the Camera tool, you can pan/zoom/rotate each morphing frame through a customized track. This makes it possible to set a moving viewpoint to see the morphing process. Choose the Sequence/Camera menu to open the Camera window below. You can also use Camera to make movie/sequence effects animated.
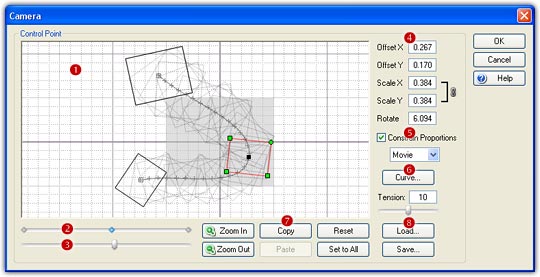
1. You can edit and preview the Camera in the workspace (![]() ). The camera is specified by a sequence of control points
and smoothly passes through each point in the sequence, just like the Track
Curve. See more about "How to Use Track".
). The camera is specified by a sequence of control points
and smoothly passes through each point in the sequence, just like the Track
Curve. See more about "How to Use Track".
2. Each control point defines a key frame with a group of
offset/scale/rotate status, and all other frames will be automatically
calculated according to the key frames. You can find the relative position of
the control points on the ruler (![]() ),
click a point on the ruler or directly click a key frame on the workspace to
start to edit it.
),
click a point on the ruler or directly click a key frame on the workspace to
start to edit it.
3. Drag the preview slider (![]() )
to preview the camera track, you can preview the final morph on the main
interface synchronously.
)
to preview the camera track, you can preview the final morph on the main
interface synchronously.
4. You can zoom the workspace by using mouse wheel scrolling or clicking the Zoom In or Zoom Out button, and you can drag and drop to pan the workspace.
5. The gray rectangle region
in the center of the workspace indicates the movie location. Drag
anywhere inside a key frame to move it, drag any of the 3 square handles to resize the frame,
and drag the circle handle to rotate the frame. The actual offset/scale/rotate
parameters (![]() )
will be calculated automatically while dragging. You can also type the desired
parameters manually. Note, a negative ScaleX will result in a horizontal flip,
and a negative ScaleY will result in a vertical flip.
)
will be calculated automatically while dragging. You can also type the desired
parameters manually. Note, a negative ScaleX will result in a horizontal flip,
and a negative ScaleY will result in a vertical flip.
6. You can use the Constrain Proportions option (![]() )
to set the proportion of a key frame to be the same as Movie, Image 1 or Image
2. If this option is unchecked, you can set an arbitrary proportion for the key
frame.
)
to set the proportion of a key frame to be the same as Movie, Image 1 or Image
2. If this option is unchecked, you can set an arbitrary proportion for the key
frame.
7. Choose a Curve button (![]() )
to set a curve for camera track. This will result in a
nonlinear camera track.
)
to set a curve for camera track. This will result in a
nonlinear camera track.
8. You can use the Copy and Paste button (![]() )
to copy the current status parameters and then paste to other key frame. Click the Reset
button to clear the current settings and back to the original status. Click the
Set to All
button to apply this camera to all sequences in the current project.
)
to copy the current status parameters and then paste to other key frame. Click the Reset
button to clear the current settings and back to the original status. Click the
Set to All
button to apply this camera to all sequences in the current project.
9. You can the Load and Save button (![]() )
to save the current camera to load it later.
)
to save the current camera to load it later.
Remarks
- You can set different camera for each sequence in a project.
- You can edit the camera while the morph movie is playing, which means you will immediately see the effects on your final morph.
- Camera is only available in FantaMorph Deluxe.