How to Use Image Sequence Packer
The built-in Image Sequence Packer tool provided in FantaMorph Pro and Deluxe is very useful for creating long morphs with three or more source images. See more about "How to Morph More than Two Images".
1. Choose the Add-Ins/Image Sequence Packer menu to open the packing window.
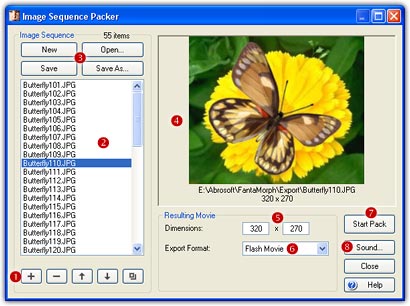
2. There is a button group used to edit image sequence (![]() ).
First Click the Add Image(s) button and choose a series of images to add
to the Image List (
).
First Click the Add Image(s) button and choose a series of images to add
to the Image List (![]() ).
In most cases, these images will be previously morphed pictures exported from
FantaMorph, but may be from any source. The number of items added will be shown
directly above the image list.
).
In most cases, these images will be previously morphed pictures exported from
FantaMorph, but may be from any source. The number of items added will be shown
directly above the image list.
3. You can select one or more of the images listed, then delete it, duplicate it, move it up, or move it down by clicking the appropriate edit buttons.
4. There is a button group for saving the finished image
sequence (![]() ).
).
5. Click to select one image in the list. It will be
previewed in the Preview Panel (![]() ),
and its size will be set into the Movie Dimensions box (
),
and its size will be set into the Movie Dimensions box (![]() )
for the resulting movie.
)
for the resulting movie.
6. You can add as many images to the list as you desire. Each image listed will become one of the frames of the resulting movie.
7. Choose one format from the Movie Format List
(![]() ),
then click the Start Pack button (
),
then click the Start Pack button (![]() ).
As FantaMorph packs each image to the movie, you will see it appear in the
Preview Panel.
).
As FantaMorph packs each image to the movie, you will see it appear in the
Preview Panel.
8. Choose the
Sound button
(![]() )
to add a background sound/music in WAV or MP3 format.
)
to add a background sound/music in WAV or MP3 format.
Remarks
- You can pack images of various formats and sizes. However, you will have better results using image sequences of the same size, as created by FantaMorph.
- You can easily change the export size of the resulting movie, but the chosen size should have the same aspect ratio as the images found in the image sequence.
- Beginning with version 3.5, you can directly morph more than two images in a single project without using Image Sequence Packer.